My printer isn't showing, or won't print
Work through these in order. Most printing problems are fixed by step 2.
-
Look at the printer itself
Walk to the printer and check three things:
- It is switched on (the screen or a light is on).
- There is no error light (usually red or orange) and no error message on its little screen.
- The paper tray has paper, and there's no paper stuck inside. If you see a jam message, open the doors it points to and gently pull out the stuck sheet.
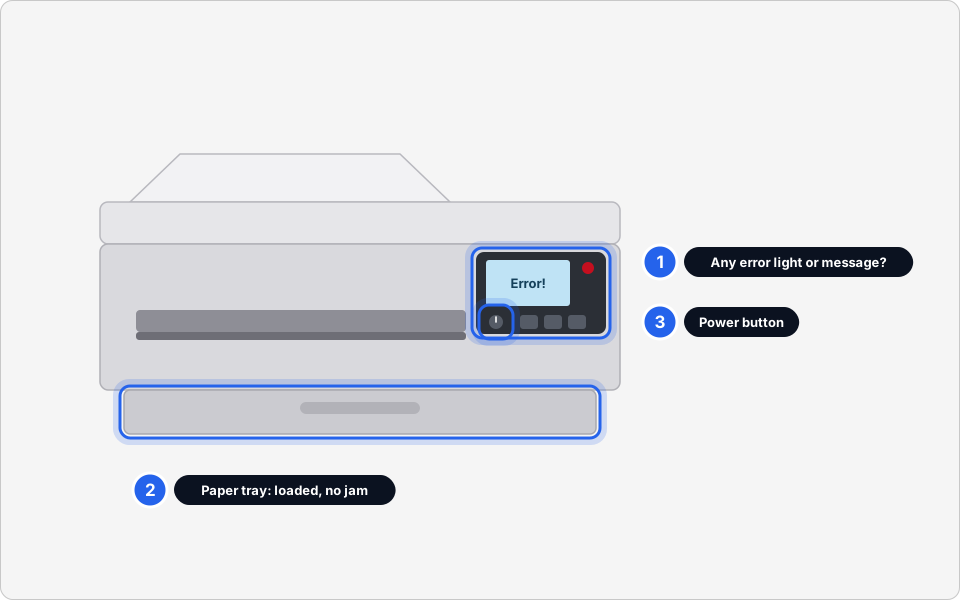
Check the lights, the paper and the power button.Click picture to enlarge -
Make sure your computer is on the staff Wi-Fi, not the guest Wi-Fi
Printers and office systems only work on the staff Wi-Fi. Guest Wi-Fi is kept separate on purpose, so it can't see the printer.
Click the Wi-Fi icon in the bottom-right corner of your screen (next to the clock). Look at which network says Connected. If it's the guest network, click your office's staff network and click Connect.
Your network names will be different from the ones in the picture. If you aren't sure which is the staff one, or it asks for a password you don't have, ask your manager or message us.
Using a computer plugged in with a network cable? You don't need to do this step. Go to step 3.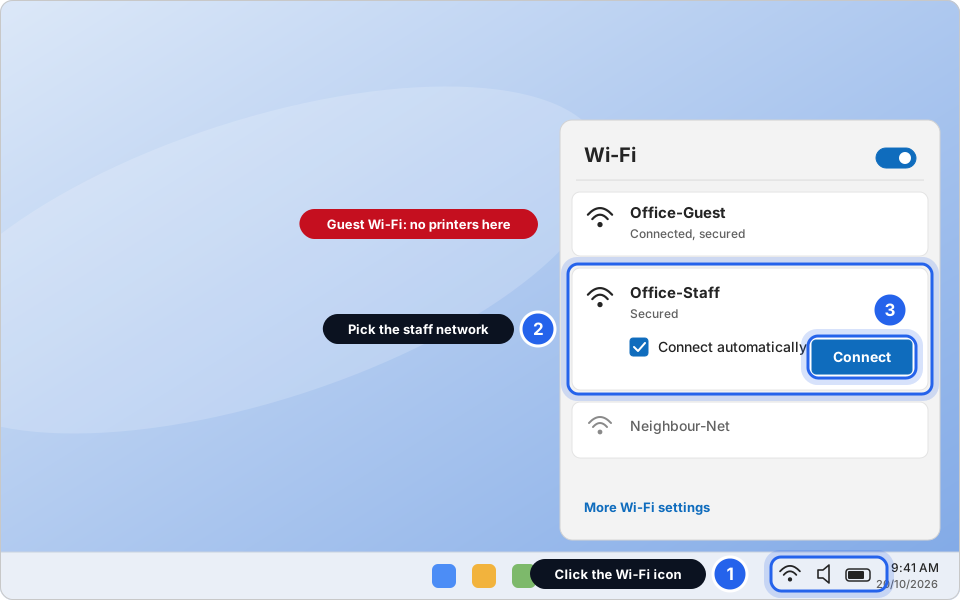
1 Wi-Fi icon · 2 Staff network · 3 ConnectClick picture to enlarge -
Restart the printer
Press the printer's power button to turn it off. Wait 10 seconds, then turn it on again. Give it 2 minutes to wake up and reconnect before you print again.
If the printer has no power button, leave it to us. Don't pull its plug out of the wall unless it's the only option.
-
Print again, then restart your computer if it still fails
Try printing a short document. If nothing comes out, restart your computer (Start then Power then Restart) and try once more. If the printer is on, has no errors, you're on the staff Wi-Fi and it still won't print, message us and tell us the printer's name.
Add a printer in Windows 11
Use this when you have a new computer, or the printer you need isn't on your list. Make sure you're on the staff Wi-Fi first (see above).
-
Open Settings and click Bluetooth & devices
Click the Start button, then the Settings cog. On the left, click Bluetooth & devices. Then click Printers & scanners in the list.
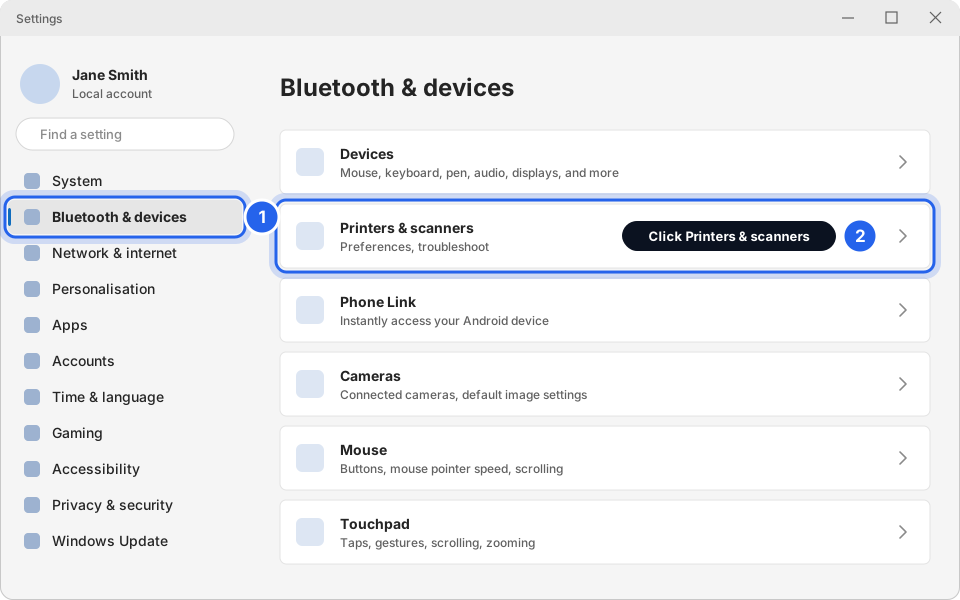
1 Bluetooth & devices · 2 Printers & scannersClick picture to enlarge -
Click Add device
It's the button at the top right. Windows now searches for printers on your network. This takes up to a minute.
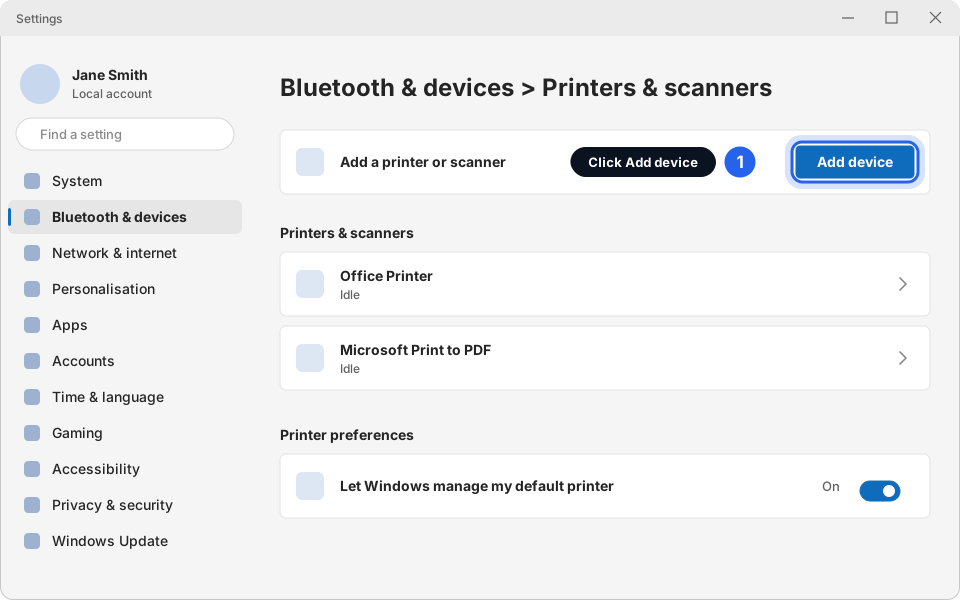
Click Add device.Click picture to enlarge -
Click Add device next to your printer's name
When your printer's name appears, click the Add device button beside it. Wait until it says it is ready.
Printer not in the list? Don't try the The printer that I want isn't listed link or Add manually. Those need technical details and a driver, and guessing can leave you with a printer that looks right but doesn't work. Message us with the printer's make and model and we'll add it for you.
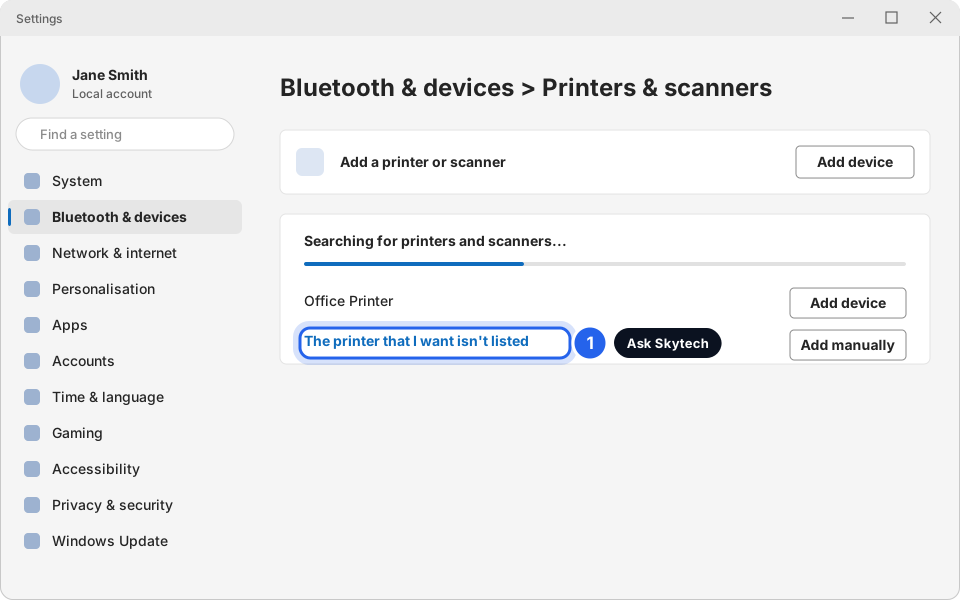
Not listed? Ask Skytech to add it.Click picture to enlarge -
Make it your default printer (optional)
The default printer is the one Windows picks automatically when you press Print. Windows likes to change this by itself, which can send your pages to the wrong printer. To stop that:
On the same Printers & scanners page, scroll down and switch Let Windows manage my default printer to Off. Then click your printer's name.
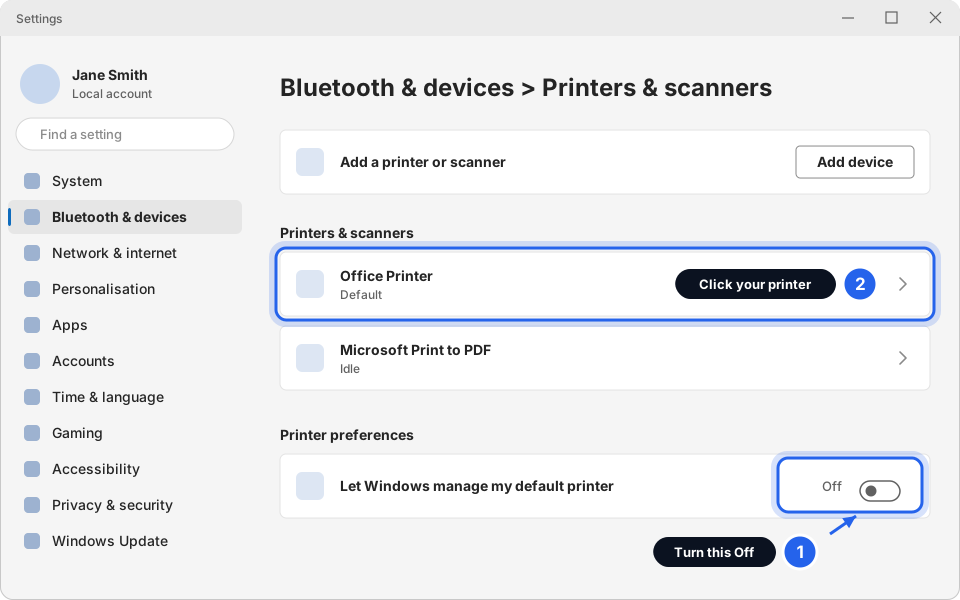
1 Switch Off · 2 Click your printerClick picture to enlarge -
Click Set as default
The button is at the top of the printer's page. If you don't see it, the Off switch in the previous step wasn't turned off yet. Go back and check. The printer's label on the previous page now says Default.
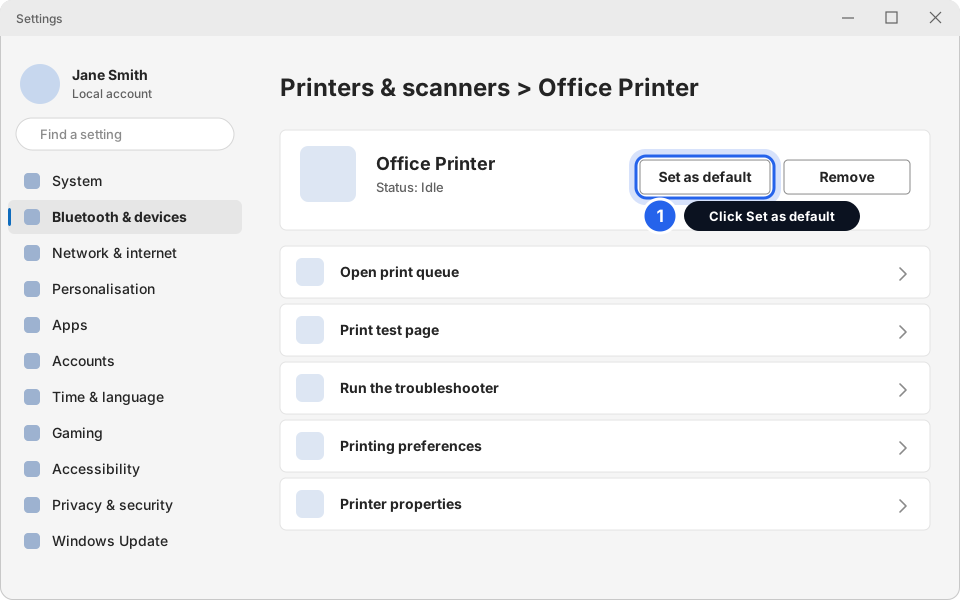
Click Set as default.Click picture to enlarge
Printer added
Open any document, press Ctrl + P, check the right printer is chosen at the top, and print a test page.
Clear a stuck print queue
Signs of a stuck queue: you pressed Print ages ago and nothing came out, or the printer shows an error while documents sit waiting. One stuck document blocks everything behind it, so you need to clear the queue.
-
Open your printer's queue
Go to Settings › Bluetooth & devices › Printers & scanners, click your printer's name, then click Open print queue. A small window opens listing the waiting documents.
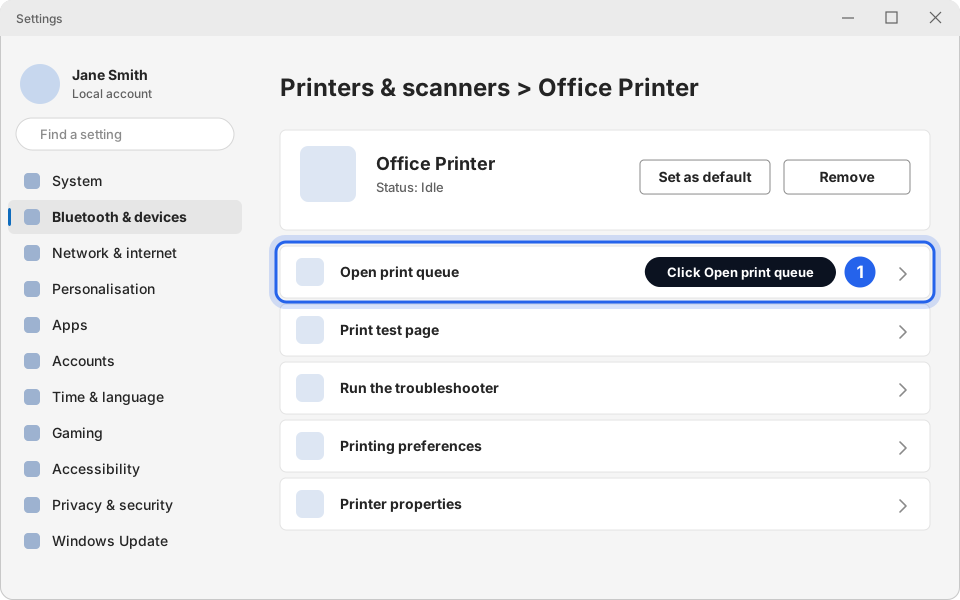
Click Open print queue.Click picture to enlarge -
Click Printer, then Cancel All Documents
Printer is the first word in the menu bar at the top left of the queue window. If Windows asks Are you sure?, click Yes. The list should empty. It can take a few seconds.
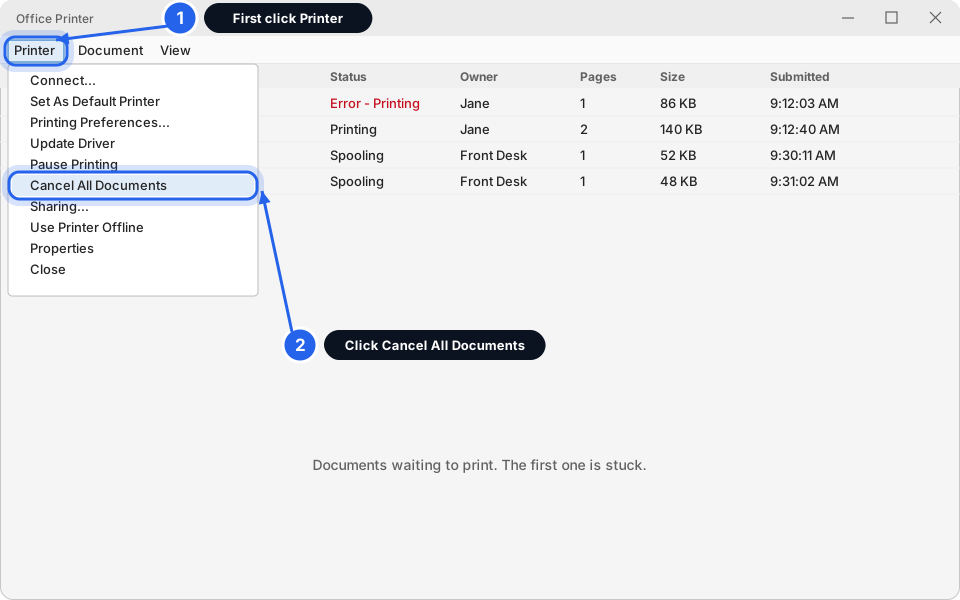
1 Printer · 2 Cancel All DocumentsClick picture to enlarge -
Restart the printer, then print again
Turn the printer off, wait 10 seconds and turn it on. Wait 2 minutes. If the queue still won't clear, or a document says Deleting for more than a few minutes, restart your computer and open the queue again.
Scan several pages into one file
Most office printers can scan a whole pile of pages in one go using the document feeder (the flat tray or lid on top that pulls pages in one by one).
-
Load the pages into the document feeder
Put the pages in the feeder tray on top of the printer, with the edges lined up. Remove staples and paper clips first. On most printers the pages go face up, but check the little picture on the feeder in case yours is different.
For a single page or something fragile, use the glass under the lid instead.
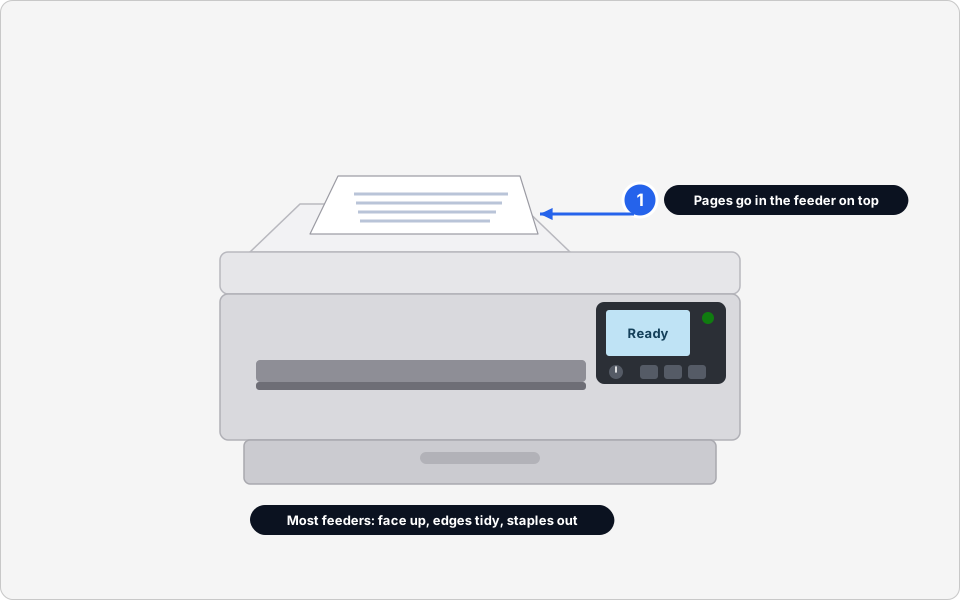
Pages go in the feeder on top.Click picture to enlarge -
Choose how to scan
Pick one of these ways:
AFrom the printer's screen (easiest). Tap Scan, choose Scan to Email or Scan to Computer, then press Start. Your pages come out as one PDF. If it asks which computer or email address, pick yours.BFrom your computer, with the Windows Scan app. Follow step 3 below.If your printer's scan-to-email or scan-to-computer isn't set up yet, the buttons will show an error or won't list your name. Message us and we'll set it up. It's a one-time job.
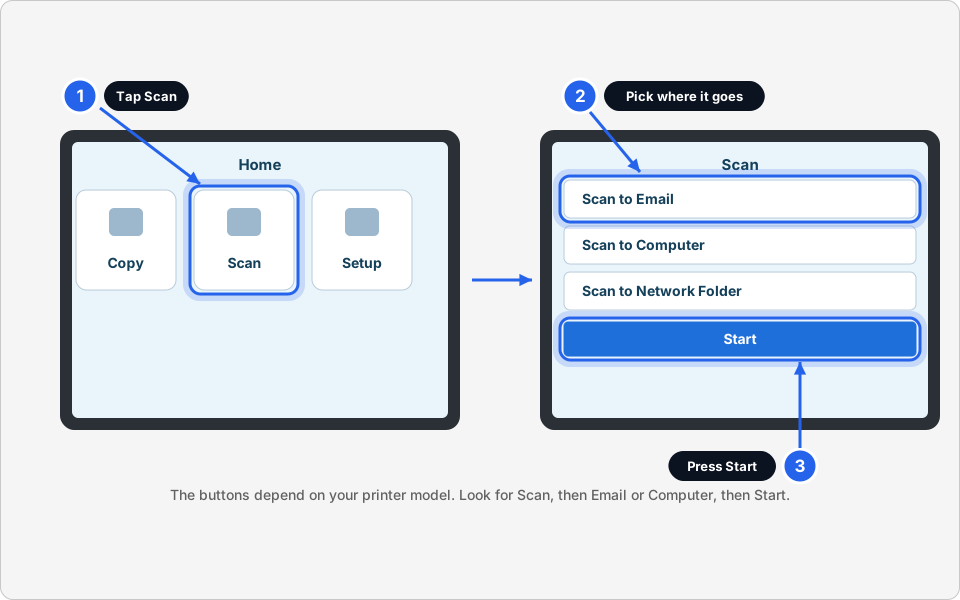
1 Scan · 2 Where to send it · 3 StartClick picture to enlarge -
Or: scan from your computer with the Scan app
Click Start, type Scan, and open the Scan app. If it isn't there, it's a free Microsoft app: ask us and we'll install it.
Choose your printer under Scanner. Under Source, choose Feeder (it may say Feeder (Scan one side)). Under File type, choose PDF. Then click Scan.
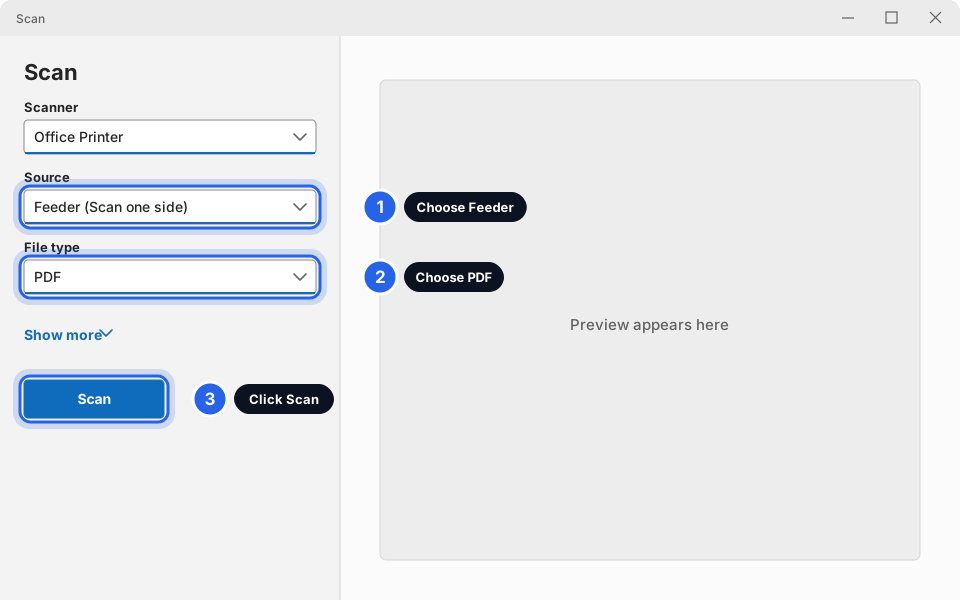
1 Feeder · 2 PDF · 3 ScanClick picture to enlarge -
Check you have one file with all the pages
Open the scanned PDF and scroll down. You should see every page. The Scan app shows where it saved the file (usually your Pictures folder, in a folder called Scans). A scan sent by email arrives like any other email with the file attached.
Got one file per page instead? Some printers and settings do that. Look for a setting called Combine, Multi-page or PDF (multi-page). If you can't find it, message us and we'll set it to make one PDF.
Scan done
If the file is too big to email, see Send a file that's too big to email.
Ink and toner problems
"Cartridge not recognised" or "not compatible"
-
Take the cartridge out and check it
Open the printer's ink or toner door and take the cartridge out. Make sure all the protective tape and plastic is gone. Many cartridges have an orange or yellow pull tab.
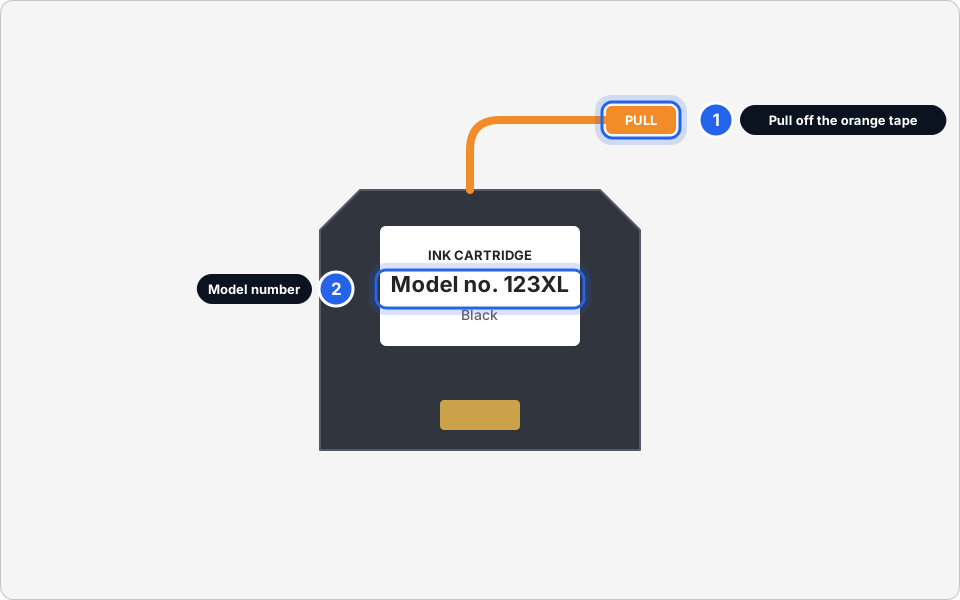
1 Pull off the tape · 2 Check the model numberClick picture to enlarge -
Check it's the right model
Compare the model or cartridge number on the label with the one on the old cartridge you took out. They must match. Printers often reject cheap copies or the wrong model, so a genuine cartridge or one sold for your exact printer is safest. If you aren't sure, send us a photo of both labels.
-
Put it back firmly and close the door
Push the cartridge in until it clicks. Close the door. Wait for the printer to finish its start-up noises. If the message is still there, turn the printer off and on once.
Blank pages, streaks or faded print
-
Print a test page from the printer's own menu
On the printer's screen, look for Setup, Tools or Maintenance, then Print test page (or Print quality report). If this page prints properly, the printer is fine and the problem is with the document or your computer. If it's blank or streaky, run Clean printhead from the same menu once, then print another test page.
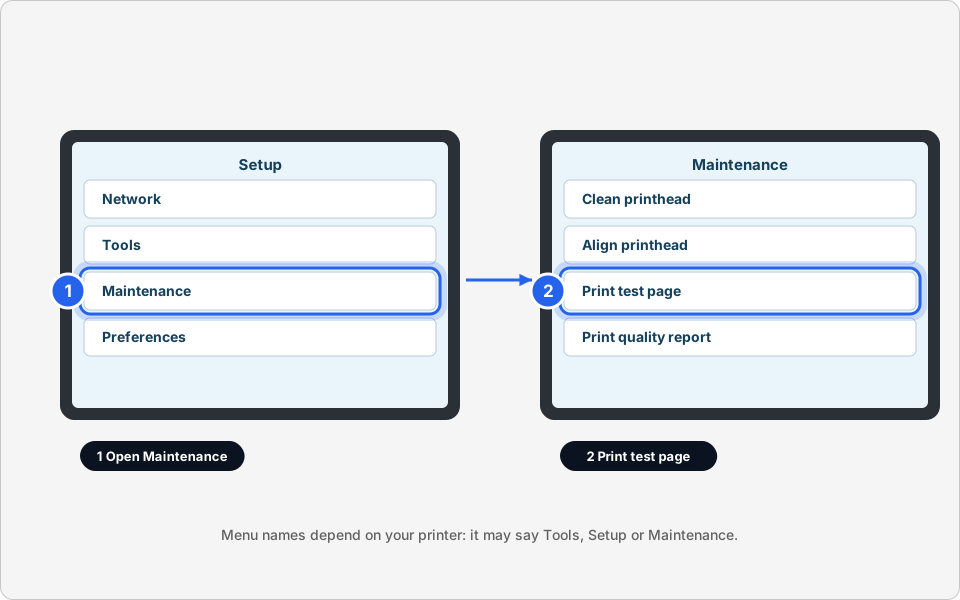
1 Maintenance · 2 Print test pageClick picture to enlarge Cleaning uses ink, so don't repeat it more than twice. If it's still blank, the cartridge may be empty or faulty. Message us.
Ordering ink, toner or paper from Skytech
Send us the three things below so we order the right item first time. You can find the printer model on the front of the printer, and the cartridge number on the old cartridge.
Order before you run out. Spare cartridges take a few days to arrive.
Still not working?
The printer shows as "Offline" on my computer
"Offline" means your computer can't reach the printer right now. Check the printer is switched on and has no errors, and that you're on the staff Wi-Fi. Then restart the printer and wait 2 minutes. If it's still offline, message us so we can look at the connection.
It prints, but to the wrong printer
Before you press Print, click the printer name at the top of the Print window and choose the right one. To stop this happening again, set your default printer (see Add a printer, last two steps).
Prints very small, cut off, or on the wrong paper size
In the Print window, check Paper size says A4 (or whatever paper is in the tray) and that Scale is set to 100% or Fit to page. Check the paper tray guides are snug against the paper.
Paper jams again and again
Remove all the paper, fan the pile, tap the edges straight and reload it, not above the fill line. Damp, curled or mixed paper jams more. If torn scraps are stuck inside, don't dig for them with sharp tools. Switch the printer off and message us.
I can print but I can't scan
Scanning needs the printer to know where to send your file (your email or your computer). It may not be set up for you yet. Message us with your printer name and what you see when you press Start.
What do I send you if none of this works?
Tell us the printer's name and model, which computer you're on, whether you're on staff Wi-Fi or a cable, and what the printer's screen says. A photo of the screen is perfect. See Take a screenshot to send us for the computer side.